

How to Set Up IPTV on Your Device
How to Setup IPTV on Smart TVs with IPTV SMARTERS PRO App
The IPTV Smarters App is an exceptional video player that enables users to watch Live TV, Movies, and Series on various devices. It supports multiple platforms, including Android, iOS, Windows, macOS, web browsers, and Smart TVs. IPTV Smarters Pro is compatible with various playlists such as Player API-based playlists, 1-Stream Panel API, and M3U playlists/URLs.
IPTV Smarters Pro / Player Features
- User-friendly interface: Easy to navigate and use
- Organized playlist: Channels, VODs, replays, EPG timeline, etc.
- Search functionality: Quickly find channels and VODs
- Built-in players: Choose from two built-in players or use VLC or MX Player externally
- EPG (TV guide) and logos: Automatic logos for TV channels
- VOD information: Access synopses, posters, ratings, and more
- Favorites list: Create a personalized favorites list
- Subscription information: View subscription status, expiration date, etc.
- M3u support: Works with or without an m3u file (using Xtream-Codes API)
- Smart TV Compatibility: Now available for Samsung and LG Smart TVs (US store)
Downloading and Installing IPTV Smarters Pro
For Android TV
Simply head to the Play Store, search for "IPTV Smarters Pro," and click "Install."
For Samsung Smart TV
- Press the Smart Hub button from your remote
- Search for the IPTV Smarters Pro to install
For LG Smart TV
- Press the Home button on the remote & Go to LG Content Store
- Search for the IPTV Smarters Pro to install
Configuring IPTV Smarters Pro / Player
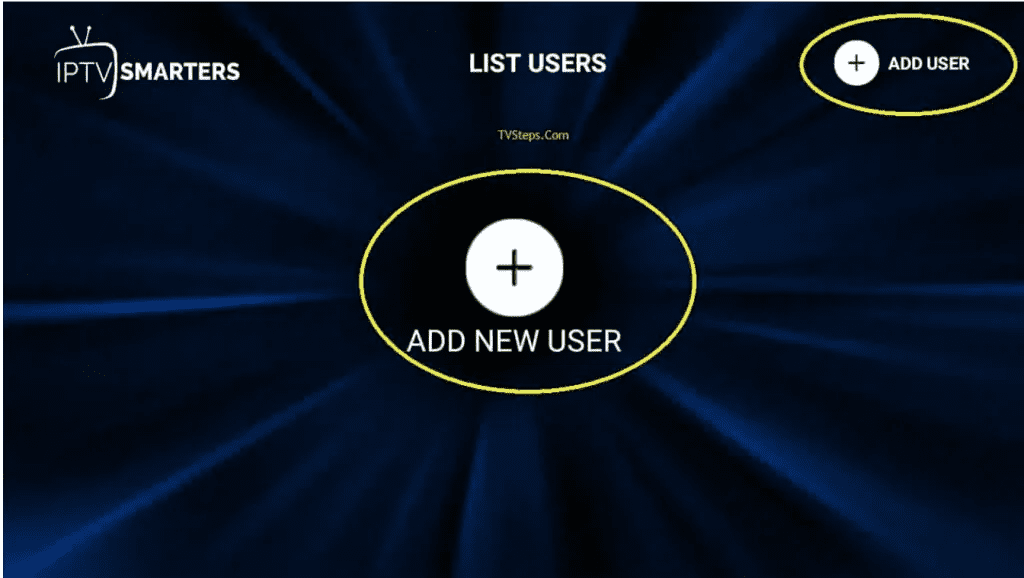
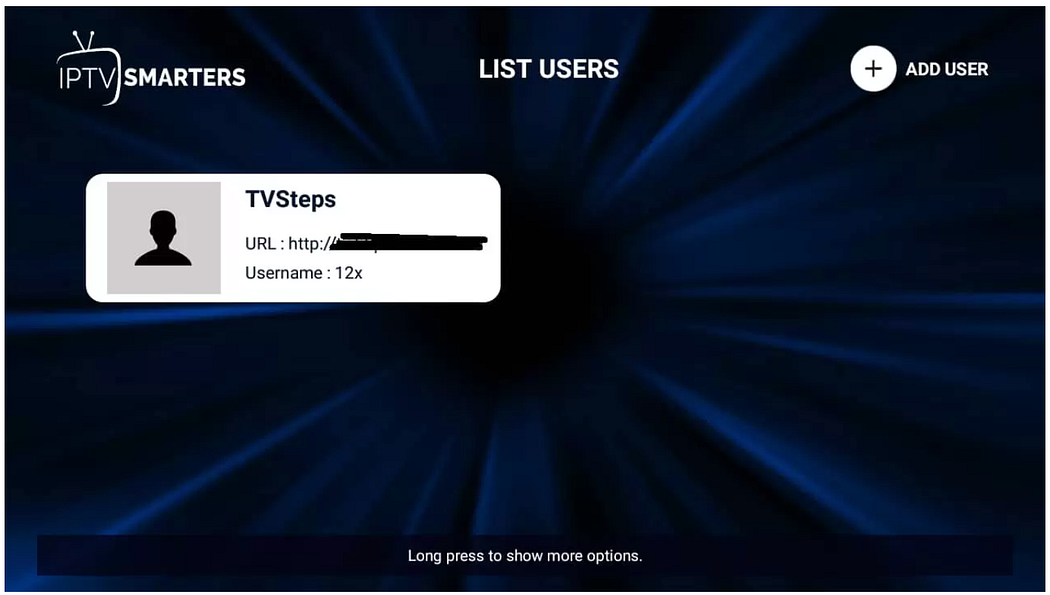
Step 1: Add New User
Click on "ADD NEW USER" to add a new user.
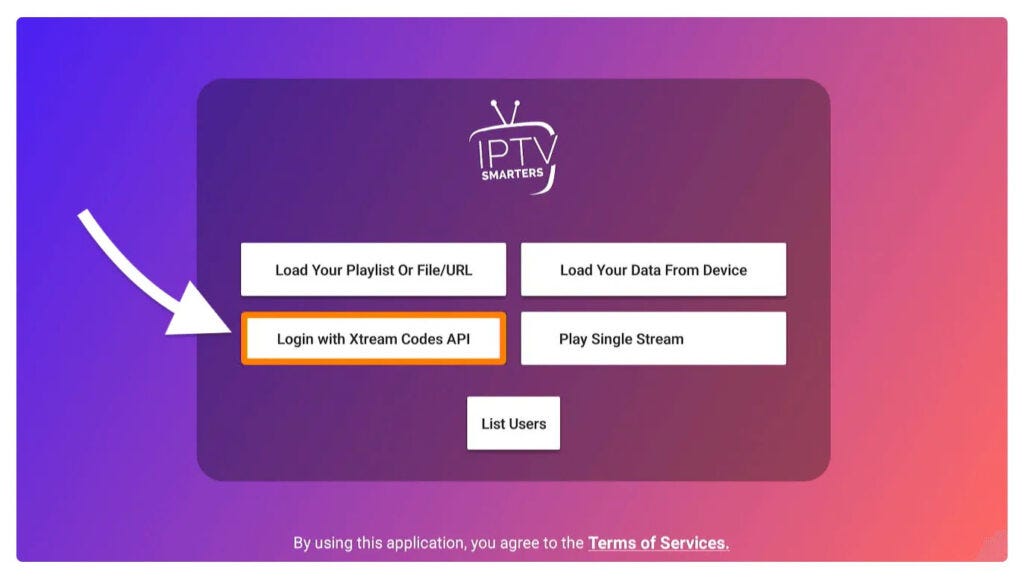
Step 2: Select API Connection
Choose "Xtream Code API Login."
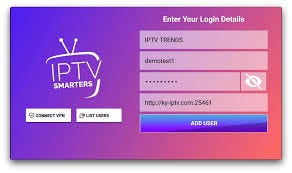
Step 3: Fill Out the Form
Enter your IPTV subscription credentials: username, password, and server URL.
Step 4: Select Your Profile
Once connected, you'll be on the dashboard. Enjoy the service by clicking on "Live TV."
Discover our IPTV subscription Offers
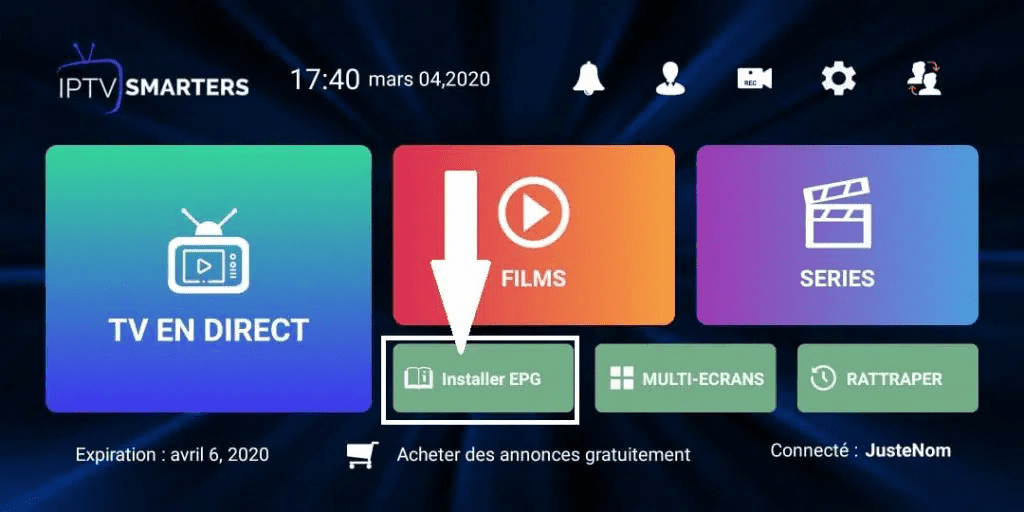
Installing EPG
Step 1: Install EPG
Click on "Install EPG" on the dashboard to automatically load the EPG. No further action is required.
Step 2: Tab Button
Press the tab button to quickly access features like EPG and playlist updates.

How to Setup IPTV on TiviMate IPTV Player
TiviMate IPTV Player is an Android base application which can use to watch IPTV. It supports both Remote playlist and Xtream codes system. Tivimate is a common app on Firestick to stream IPTV channels.
Here we are going to check how can we add IPTV channels on TiviMate IPTV Player via Xtream codes.
Setup Tivimate IPTV Player via Xtream Codes API
Step 1: Download and Install
First of all download and install app from here: https://play.google.com/store/apps/details?id=ar.tvplayer.tv
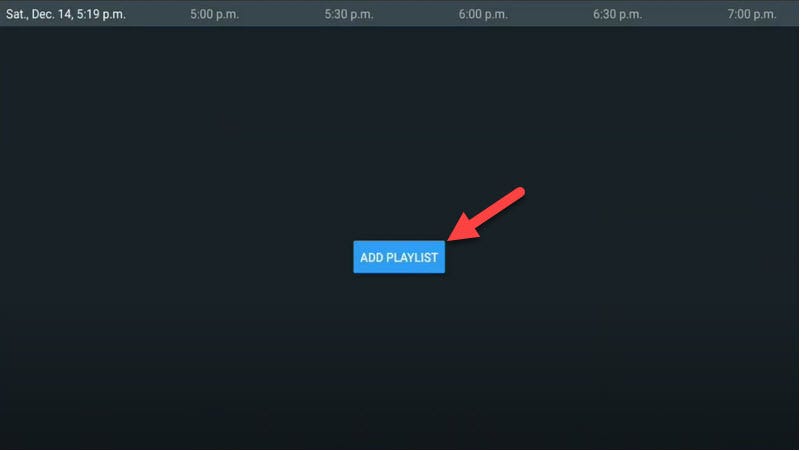
Step 2: Add Playlist
After open Tivimate click on "ADD PLAYLIST".
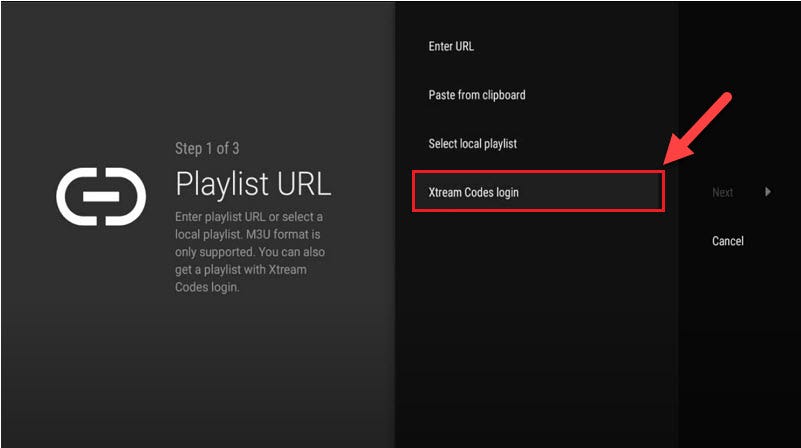
Step 3: Select Login Method
Click on "Xtream Codes login" and them Next.
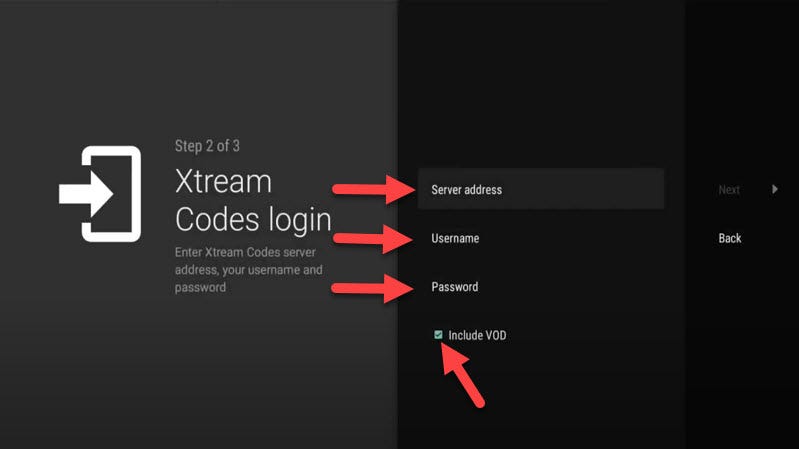
Step 4: Enter Credentials
In this step you need to add Server address, Username and Password which can be found on your M3U url.
The progressive IPTV providers give you a dashboard which you can access your M3U url in dashboard.
If you want to have VODs too, mark "Include VOD".
Discover our IPTV subscription Offers
Features on Tivimate IPTV Player
You access many different useful features on Tivimate, we are listing some of them:
- Multiple playlists: Effortlessly manage and switch between multiple channel playlists
- Catch-up: Never miss a show again with convenient access to past broadcasts
- Favorite channels: Bookmark your most-watched channels for instant access
- Recording: Record your favorite shows to watch them later
- Search: Find channels and shows instantly with intuitive search
- Parental controls: Manage access with ease, ensuring a safe viewing environment
- Multiview: Watch different channels simultaneously on the same screen
- UI customization: Adjust the user interface to your preferences for a unique experience
Using TiviMate IPTV Player
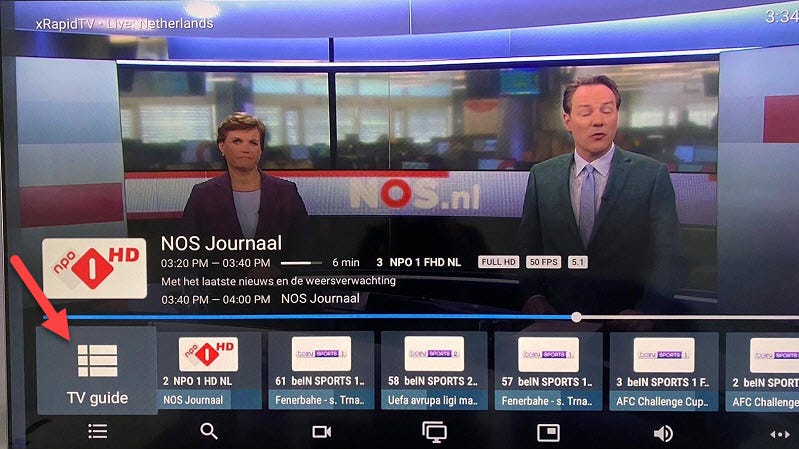
Accessing the TV Guide
After you open channel you can see this view, you can access EPG by click on "TV guide".
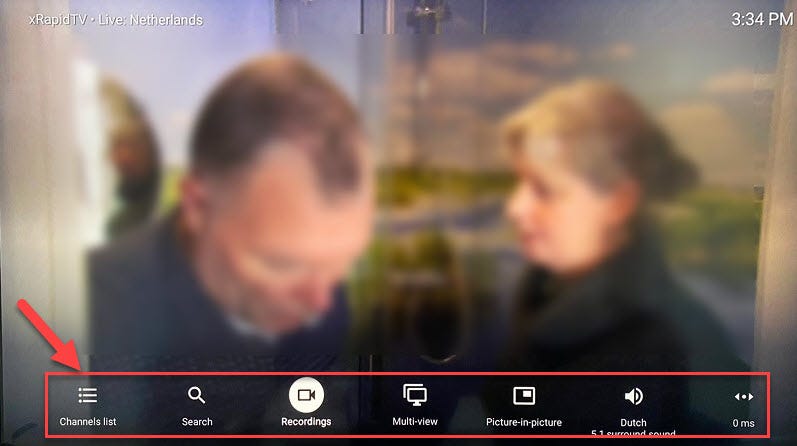
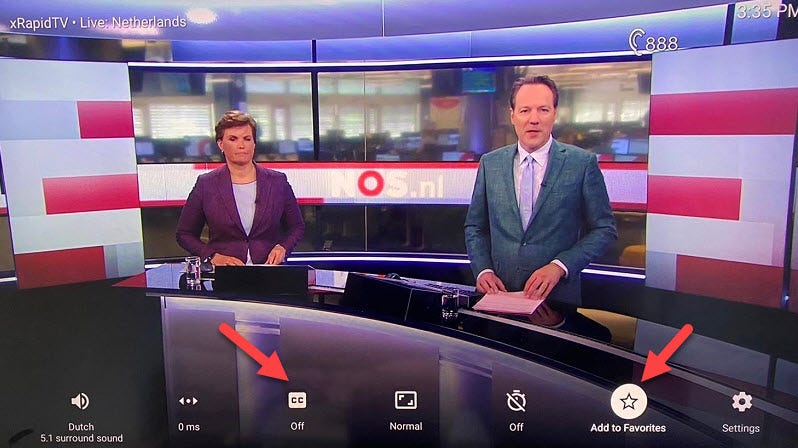
Quick Settings Menu
By holding the "OK" button for 2 seconds you can see the setting menu, here you can see many features like Recording.
Additional Options
Scroll right a little and you will see other options like subtitle enable "CC" or "Add to Favorites".
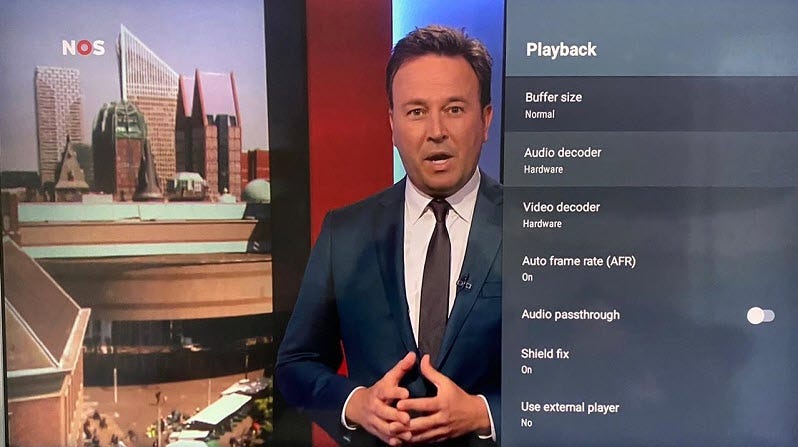
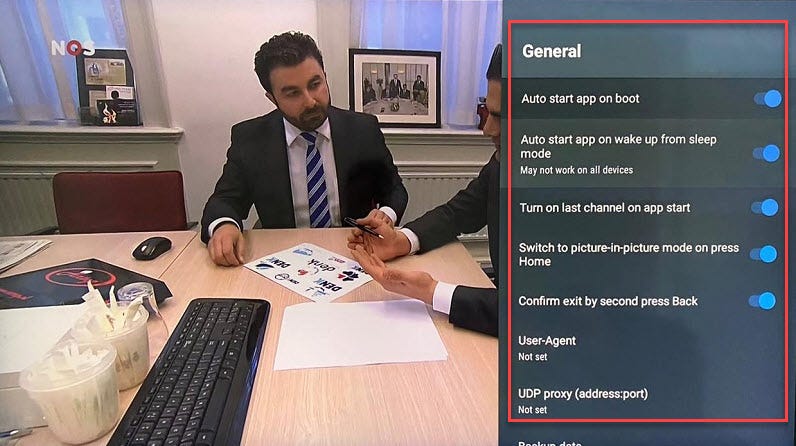
Advanced Settings
At the end right click on "Setting" to see more options.
Note: The app is intended for Android TV devices and is not optimized for phones and tablets.
How to Setup IPTV on Apple TV – Step-by-Step Guide

Apple TV is a top pick for IPTV because it boasts top-notch quality, innovation, and strong hardware. It offers a smooth user experience with the Apple ecosystem. This makes it an excellent choice for those wanting high-quality streaming services. Setting up the best IPTV service on Apple TV is simple. You just need to download an IPTV app from the App Store, add your account details, and start streaming.
Setting up IPTV on Apple TV is easy, a big plus. You just download an IPTV player app and enter your subscription info. This simple method means you can enjoy a lot of channels quickly.
IPTV Smarters Pro, GSE Smart IPTV, and IPTVX are popular IPTV players for Apple TV. IPTV Smarters Pro is great because it works with different formats, like M3U. GSE Smart IPTV is easy for new users with its simple design. And IPTVX is known for its cool look and how well it works with Apple TV.
Choosing the Best IPTV App for Apple TV
Getting a good IPTV app for Apple TV is key for great streaming. We'll look at three top apps for the Apple TV 4K:
iPlayTV

iPlayTV is a top pick because of its easy interface and strong features. It costs $5.99. Users like how it's easy to set up and can handle different formats, such as Xtream Codes.
The app lets you use many playlists, an electronic program guide (EPG), and sync with Apple iCloud. This makes things easy to use on different devices. The latest update, version 2.8.1 on May 29, 2024, fixed some small issues, making the app more stable.
Xtream IPTV
Xtream IPTV is another good choice for Apple TV 4K. It works well with iOS devices. You can add playlists by putting in server details and passwords.
It supports the best picture quality formats, like Dolby Vision. Plus, the developer, Nguyen Van Sy, makes sure your privacy is safe. No personal data is collected, which means it's a reliable app.
GSE Smart IPTV
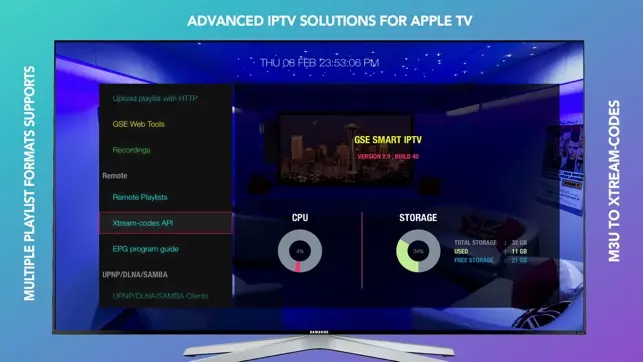
GSE Smart IPTV is known for being full of features and cost-effective. It only costs $4.99 on the Apple TV App Store. It works with many IPTV formats and services, such as M3U and PLEX.
You can do things like watch in a small window while doing something else (Picture in Picture), send the video to your TV (Airplay 2 casts), use subtitles, and control what your kids watch (parental controls).
Choosing the right IPTV app for your Apple TV means thinking about what you really want. Each app we talked about has something special to offer. Pick the one that matches your needs to make your IPTV experience on the Apple TV 4K really good.
Discover our IPTV subscription Offers
Pre-requisites for Setting Up IPTV on Apple TV
Stable Internet Connection
A good, fast internet link is needed for IPTV to work on Apple TV. IPTV apps use different network types like FTP and RTMP. This makes a stable network crucial for watching your shows smoothly without pauses or delays.
Active IPTV Subscription
To get IPTV running on Apple TV, you must have a subscription. Services such as IPTVProviders has many plans to choose from. They give you lots of TV channels and shows. Make sure to get your server URL, username, and password from a trusted provider.
Apple TV with Updated Software
Your Apple TV should always have the latest software. Check for updates often to keep your device compatible and working well with IPTV. This is important because apps like IPTV Smarters Pro are frequently updated to improve their features and fix any bugs.
Setting Up IPTV on Apple TV
Installation Process
First, go to the App Store on your Apple TV. Look for the "IPTV" app You prefer and download it. After installing, open the app to continue.
Playlist Configuration
When you open the app, you need a playlist to watch. Click to add a new playlist. You'll need to enter a username, password, URL, and pick a name for your account.
Make sure to get the details right from your service provider. The URL has to be in a specific format, like http://x.x.x.x:8089/devices/ANY/channels/123/stream.mpg. Accurate details lead to smooth watching.
How to Setup IPTV on Smart TVs with FLIXIPTV App

Flix IPTV is an IPTV player like Smart IPTV but more stable that allows you to stream content. The application does not offer its own content, so you need to have a playlist or a m3u link, i.e. an IPTV subscription.
Flix IPTV is an interesting and stable application, even with big playlists, which is surely worth using on your Smart TV.
Discover our IPTV subscription Offers
Flix IPTV Features
Flix IPTV offers a variety of useful features. The features listed below can be found by going to the application settings.
Multiple language support
Users can choose from over 17 languages. Just go to Settings and select "Change Language".
Several themes
Don't like the default Flix IPTV theme? You can choose a new one by going to Settings, then Change Theme.
Support for external players
You can select MX Player and VLC Player as external players in the application. Go to Settings, then select External Players.
* This option is available for Android and iOS devices.
Customize subtitles
It is very rare that an IPTV player offers subtitle customization. Flix IPTV is one of those few apps. Go to Settings, then Subtitle Settings to change the size, color and background of your subtitles.
Other features of Flix IPTV include creating lists of favorites, changing servers or lists since it supports adding multiple playlists, hiding specific categories of content in channels or movies and series, etc.
Flix IPTV Supported Devices
Below you can find the list of devices on which you can install the Flix IPTV application:
- Samsung Smart TV
- LG WebOS
- Android TV, Apple TV and Amazon Fire TV or FireStick
Installing Flix IPTV is easy like any other application, just go to the application store and search for it by name on Smart TV or Android TV and Apple TV.
The application is not in the Amazon Apps store. You can install the app on your Fire TV device by typing flixiptv.cc/flix.apk in the Downloader app or in the URL field of your device's browser.
How to Setup Flix IPTV
Now we show you how to setup your subscription on the Flix IPTV application using your m3u link:
Step 1: Find MAC Address
Once the application is installed, launch it to have its mac address displayed on the screen.
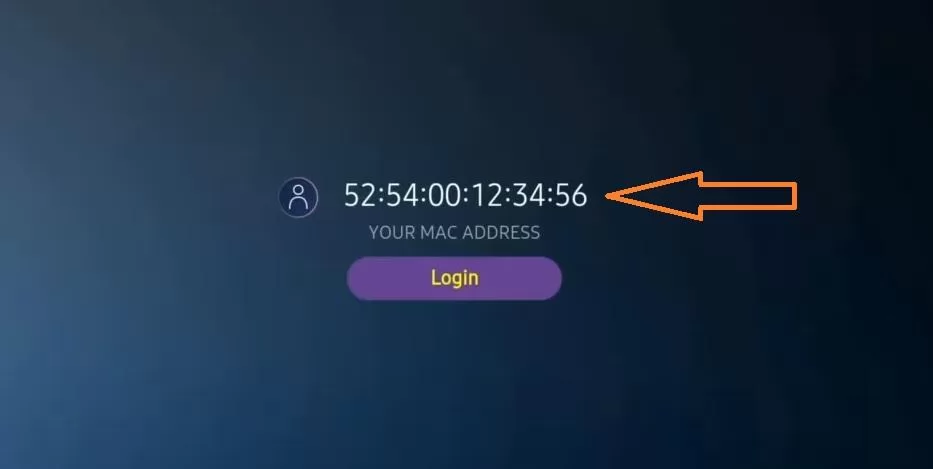
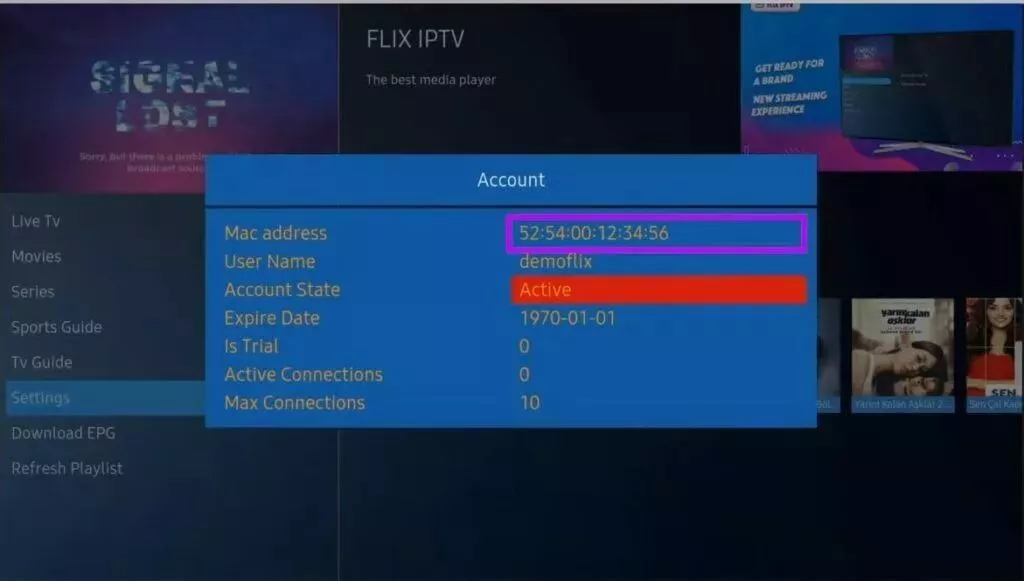
If you didn't write the mac address, you can find it by going to the menu on the left, navigating to Settings and in the next menu, scroll to User Account.
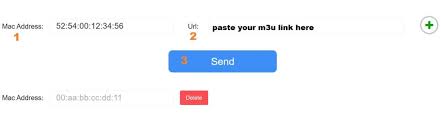
Step 2: Access Setup Website
Go to the link: https://flixiptv.eu/mylist
Step 3: Enter Your Information
Fill in the requested informations, the mac address and your m3u link then click on Send.
Step 4: Restart Application
The last step is to restart the application or refresh the list on Settings > Change Playlist. A window will appear asking you to reload the list, click OK.
How to Activate Flix IPTV
Flix IPTV is like other applications for Smart TV (SET IPTV, NET IPTV, Smart STB, …) it offers 7 days free trial, after that you will have to pay 7,99 EUR to activate it for life on a single device or TV.
Here is the link to the activation page: https://flixiptv.eu/activation
Our Opinion on Flix IPTV
Flix IPTV is one of the best IPTV applications. It has a number of useful and rare features. Follow the steps above to start using it especially for Smart TVs.
How to Setup IPTV on Fire TV Stick
How to Install IPTV Smarters Pro on Fire TV Stick
From the home screen of your device, hover over the Find option. We will first install the Downloader app which will help you sideload IPTV Smarter on FireStick (because browser downloads are not allowed).
Step 1: Install Downloader App
Click the Find > Search option on the home screen of FireStick
Type the name of the app (which is Downloader), click the Downloader option when it is displayed in the search results, and download and install the app.
Step 2: Configure FireStick Settings
Get back to the home screen of FireStick after installing the Downloader app. In the menu bar, click Settings
In the Settings, choose the option My Fire TV
When the following set of options are displayed on the next screen, click Developer Options
Click Install from unknown apps
Click Downloader to change the status to ON
With this, you have configured the FireStick settings to allow the installation of IPTV Smarters and other third-party apps. Follow the steps below:
Step 3: Download IPTV Smarters Pro
You may now open the Downloader app. When you run this app for the first time, a set of prompts will appear. Dismiss them until you see the main screen. On this screen, you need to click the URL textbox on the right side (make sure Home option in the left menu is selected) where it says 'http://'
Go ahead and enter the following path on this window: https://bit.ly/mainsmart
Click GO and give it a minute or two until the IPTV Smarter is downloaded onto your FireStick device
Step 4: Install IPTV Smarters Pro
When the download has completed, the Downloader app will run the APK file and the installation will start. Click Install
Wait for the installation to finish. When installation is concluded with the App installed notification, you may now choose to click OPEN and get started with IPTV Smarters. I recommend choosing DONE so that you may first delete the APK file and save some space on the FireStick storage
If you clicked DONE above, you will be back on the Downloader interface. Click Delete
Discover our IPTV subscription Offers
Using IPTV Smarters on Fire TV Stick
Great! You now have the IPTV Smarters app on FireStick. Launch IPTV Smarters on Firestick either by going to Your Apps & Channels section or pressing & hold the Home button and then select Apps from the next screen.
Step 1: Launch the App
Scroll down and you will see the app appears at the bottom so press select to launch it.
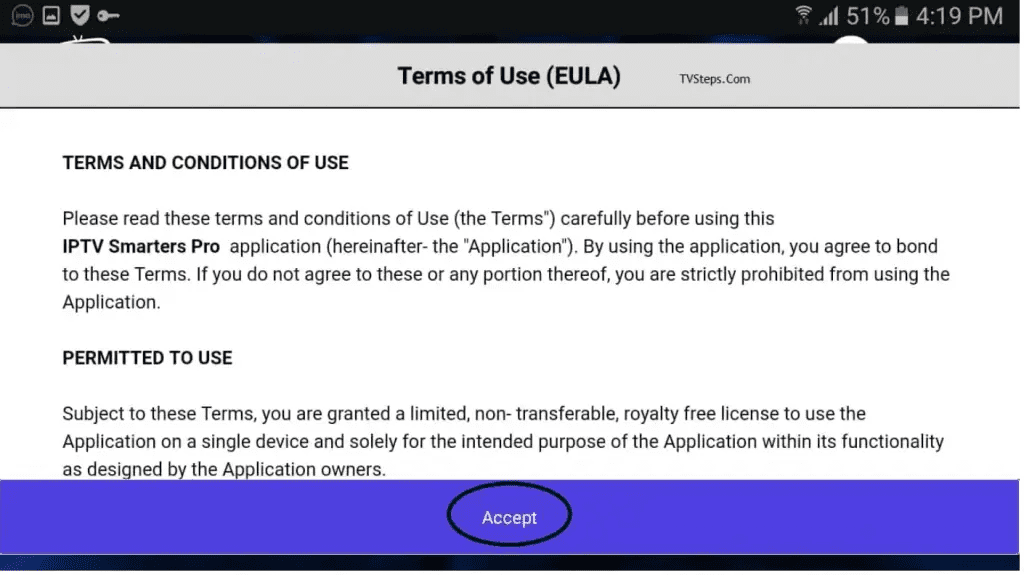
When launching it for the first time you will be asked to agree with their user agreement so simply click on the Accept button.
Step 2: Add User
Once it's done from the next you will be asked to Add a User so for this just click on the Add User button.
From the next screen, you will notice multiple options to Log Into the Smarters Pro. Now you need to choose Login with Xtreme Codes API which is the fast method.
Step 3: Enter Your Credentials
After that you will notice various fields appear there so you need to fill them as follow:
- Any Name: Type the name of your user.
- Username: Write the username provided by the seller.
- Password: It is also provided by the IPTV provider.
- URL: Just copy the portal URL from the provider and paste it here.
Once you filled every field just click on the Add User and it will create a new profile.
Step 4: Start Watching
After that, you will notice the user is listed on your screen so click the User that you created.
From the next screen, it shows Downloading Live Channels, Movies, and TV Shows so just wait for a while until it completes.
Once the downloading is completed a simple interface will appear with Live TV, Series, Movies, and other options. Now you just need to select any of these options and then it will Show Content available in that category.
How to Install XCIPTV Player on Android Devices
XCIPTV Player is a popular IPTV application for Android devices that offers a user-friendly interface and supports multiple playlist formats. Follow these simple steps to install and set up XCIPTV on your Android device.
Installation Process
Step 1: Access Google Play Store
Unlock your Android device and go to Play Store (Google Play).
Step 2: Search for the App
Browse for XCIPTV Player in the Google Play Store.
Step 3: Install the App
Select Install to install XCIPTV Player on your Android device.
After installation is complete, launch the IPTV player.
Discover our IPTV subscription Offers
Setting Up XCIPTV Player
Step 4: Enter Your Credentials
You have successfully installed XCIPTV APK on your device! Now enter your IPTV service login credentials and click Sign In when finished.
Step 5: Start Streaming
Done! You can now enjoy your favorite channels and content through the XCIPTV Player.
XCIPTV Player Features
- Multi-format support: Compatible with M3U, Xtream codes, and more
- User-friendly interface: Easy navigation and channel management
- EPG integration: Supports electronic program guide
- Favorites: Create and manage your favorite channels list
- VOD section: Access to movies and TV series
- Multiple device support: Works on phones, tablets, and Android TV boxes
How to Setup IPTV on Apple / iOS with Smarters Player Lite
Setting up IPTV on your Apple/iOS device is simple and straightforward with the Smarters Player Lite app. Follow these steps to get started with your IPTV subscription on iPhone or iPad.
Installation Process
Step 1: Download the App
Start by downloading Smarters Player Lite app from the Apple Store through this URL: https://apps.apple.com/in/app/smarters-player-lite/id1628995509 or you can search for it on App store and install the app on your iOS device.
Step 2: Open the App
Open the app once downloaded and you'll see the login screen where you can enter your subscription details.
Discover our IPTV subscription Offers
Setting Up Your Account
Step 3: Enter Login Details
Enter the login details that we have provided you after you get a subscription with us.
Now click on "ADD USER" to proceed to the next section.
Step 4: Access Content
Wait a few seconds while the app loads your subscription information. Then click on "Live TV" icon as depicted in the image via a red arrow.
Watching Content
Step 5: Select Channel Group
Now you must select the channel group that you want to watch and proceed to the next section.
Step 6: Watch Full Screen
Now you must click on the channel name and then double click on the small screen to turn into full screen as the final step.
Step 7: Add EPG (Optional)
To add EPG (Electronic Program Guide), there's no need to add any EPG URL. Just click on "Install EPG".
Smarters Player Lite Features
- User-friendly interface: Easy to navigate even for beginners
- Multi-screen support: Works on iPhone and iPad with adaptive layout
- Live TV and VOD: Access to both live channels and on-demand content
- EPG support: Program guide to see what's playing
- Favorites: Create and manage your favorite channels
- Search functionality: Find content quickly with search
MAG Device IPTV Setup Tutorial
This tutorial will guide you through simple and effective steps of installation for your MAG device (250/254/256 or other models). MAG boxes are dedicated IPTV receivers designed specifically for streaming television services.
Important: MAC Address Required
For the activation of our IPTV subscription on your MAG box, you must send us with your order the MAC address found on the label behind the box. The activation is done entirely remotely. After activation, we will send you a URL link that you have to put on your PORTAL, as shown in the steps below.
Setup Process
Step 1: Access Settings
When the box is being loaded the main portal screen appears. After that click on "settings", and press the remote button "SETUP/SET".
Step 2: System Settings
Then press on "System settings" and click on "Servers".
Step 3: Access Servers
Click on 'Servers'
Discover our IPTV subscription Offers
Step 4: Select Portals
Choose and Press option 'Portals'
Step 5: Enter Portal Information
In the 'Portal 1 name' line enter a portal name (for example, "My IPTV") and in the 'Portal 1 URL' enter the portal URL we provided after activation.
Step 6-8: Save and Reboot
- Step 6 – Finally when you complete select and click 'OK' to save the changes.
- Step 7 – Click 'EXIT' on the remote control after the settings are being saved.
- Step 8 – Consequently you have to reboot the box. Choose the option 'OK' to make the changes applied.
MAG Box Features
- Dedicated IPTV hardware: Designed specifically for IPTV streaming
- Stable performance: Optimized for continuous streaming with minimal buffering
- Full EPG support: Comprehensive electronic program guide
- User-friendly interface: Easy navigation with the included remote
- Multiple profiles: Support for multiple portal configurations
How to Install IPTV Smarters Pro on Windows
IPTV Smarters Pro is available for Windows computers, allowing you to enjoy your IPTV subscription on laptops and desktop PCs. Follow these simple steps to get started with your Microsoft device.
Installation Process
Step 1: Download the Application
Go to the search engine and type in "IPTV Smarters Pro". Then open the website https://www.iptvsmarters.com and select Downloads in the Menu.
Download the new version of IPTV Smarters Pro for Windows.
Step 2: Install the Application
- After the file download is complete, click on the executable file
- Windows will ask you for permission to open this file. Select "Yes"
- The file will now begin the installation process. This should take between one and two minutes
Discover our IPTV subscription Offers
Setting Up Your Account
Step 3: Configure Your IPTV Service
Once the installation is complete, start the IPTV Smarters program. Click Add New User and select Login with Xtream Codes API. Add your login data (username, password and Portal URL) for your IPTV service.
Step 4: Start Watching
You are now ready to start watching content on IPTV Smarters Pro! You'll have access to all your subscribed channels and content directly on your Windows PC or laptop.
Windows IPTV Features
- Multi-screen support: Watch on desktop computers, laptops, and tablets
- Large display viewing: Enjoy content on bigger screens for better viewing experience
- Keyboard controls: Easy navigation with keyboard shortcuts
- EPG support: Access electronic program guide for planning your viewing
- Multi-device compatibility: Use the same subscription across different devices
- HD and 4K support: Stream high-definition content when available
System Requirements
- Operating System: Windows 8/10/11
- Processor: 2.0 GHz or higher
- RAM: 4GB or higher
- Storage: 100MB of free space
- Internet: Stable connection (5Mbps or higher recommended)
How to Install IPTV on ENIGMA 2
Enigma 2 is a popular Linux-based operating system for satellite receivers and set-top boxes. This guide will show you how to install IPTV on your Enigma 2 device using PuTTY software.
Prerequisites
For Enigma 2/Linux installation, you need to install PuTTY software on your Windows PC to access your receiver via Telnet.
You'll also need your IPTV subscription details, including the M3U link provided after you order.
Installation Process
Step 1: Find Your Receiver's IP Address
On your Enigma 2 device, navigate to Settings > Setup > System Network Device > Setup Adapter > Settings and get your IP address (it typically starts with 192.168...).
Step 2: Download and Set Up PuTTY
- Go to your Windows PC and download PuTTY Software from the official website.
- Open PuTTY after installation.
- Add your device's IP address in the Host Name field.
- Add Port 23 (for Telnet connection).
- Click on Open to establish the connection.
Discover our IPTV subscription Offers
Step 3: Login and Install IPTV
- Your default login and password are both root
- Copy and paste the following command, replacing "your m3u link" with the actual link provided with your subscription:
- After entering the line, RIGHT CLICK your mouse button to paste, then press ENTER
- Type reboot and press Enter. Your device will restart.
Step 4: Accessing Your IPTV Channels
After your device reboots, your IPTV channels should be available in your channel list. Navigate to your TV channels menu to start watching your IPTV content.
Enigma 2 Features
- Linux-based: Stable and reliable operating system for set-top boxes
- Open-source: Customizable with various plugins and extensions
- DVR capability: Record your favorite shows
- EPG support: Comprehensive electronic program guide
- High performance: Optimized for streaming media content
Troubleshooting
- Connection issues: Verify your network connection and make sure your device is properly connected to the internet.
- Script errors: Double-check that you've entered the command correctly with your valid M3U link.
- Channel not appearing: Refresh your channel list or reboot your device again.